Case Media
Case Notes
This page keeps the media, full prompt, and original source together so you can inspect the result first and decide whether the prompt is worth copying, saving, or comparing.
Case Insights
To make this page easier to search, cite, and reuse later, the case is also broken down into practical guidance about usage, visual cues, and prompt structure.
Best Fit Scenarios
- Use this as a poster & illustration benchmark when you need a fast style baseline before rewriting your own prompt.
- It is especially helpful if your target overlaps with Poster, Illustration, Infographic and you want to judge the image result before tuning wording.
- Keep it as a control sample when you compare nearby prompt variants one variable at a time.
Visual Signals To Notice
- The clearest style signals here are Poster, Illustration, Infographic, so those should usually stay in your first rewrite.
- Pay close attention to layout rhythm, headline hierarchy, illustration texture, and how information is staged in the frame.
- This case keeps 2 media outputs, which makes it easier to check whether the style remains stable across multiple results.
How The Prompt Is Structured
- The prompt reads as a long, highly specified prompt, which is useful when you want to judge how much specificity this direction needs.
- Its keyword cluster is centered on Poster, Illustration, Infographic, so you can usually keep that cluster while swapping subject, camera, layout, or copy details.
- A practical rewrite path is: keep the outcome, keep the strongest style cues, then replace only the subject and environment blocks.
Good Follow-up Questions
- What changes first if you keep Poster, Illustration, Infographic but switch the subject matter?
- Which part of the result comes from section-level structure (Poster & Illustration) versus tag-level style cues?
- Which related cases in the same section give you a cleaner or more extreme variation of the same direction?
Full Prompt
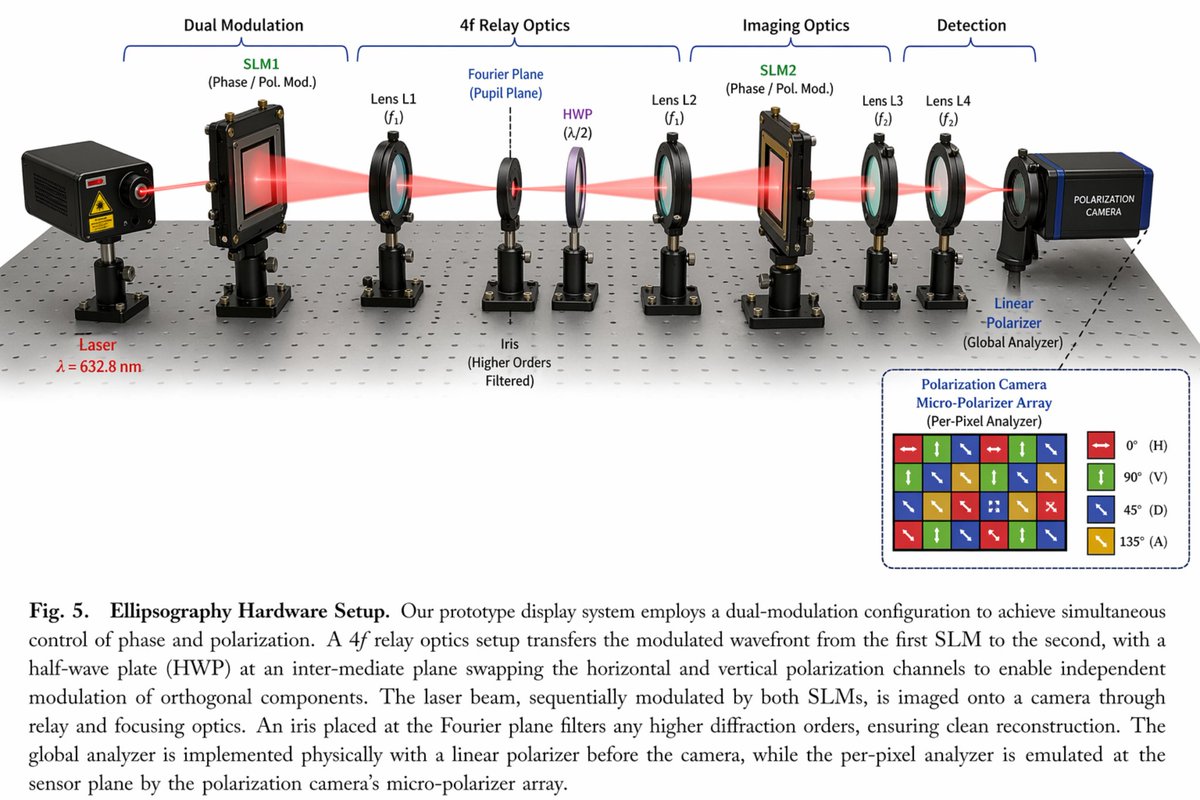
{ "type": "scientific optical setup diagram", "main_setup": { "base": "optical breadboard table with grid of mounting holes", "beam": "red laser beam passing horizontally through all components", "top_grouping_brackets": [ "{argument name=\"first component group\" default=\"Dual Modulation\"}", "4f Relay Optics", "Imaging Optics", "Detection" ], "components_left_to_right": [ { "name": "Laser", "label": "{argument name=\"laser wavelength\" default=\"λ = 632.8 nm\"}", "appearance": "black rectangular box" }, { "name": "SLM1", "label": "(Phase / Pol. Mod.)", "appearance": "black square device on post" }, { "name": "Lens L1", "label": "(f1)", "appearance": "lens in black ring mount" }, { "name": "Iris", "label": "Fourier Plane (Pupil Plane) / (Higher Orders Filtered)", "appearance": "black ring mount with dashed line above" }, { "name": "HWP", "label": "(λ/2)", "appearance": "purple-tinted optic in black ring mount" }, { "name": "Lens L2", "label": "(f1)", "appearance": "lens in black ring mount" }, { "name": "SLM2", "label": "(Phase / Pol. Mod.)", "appearance": "black square device on post" }, { "name": "Lens L3", "label": "(f2)", "appearance": "lens in black ring mount" }, { "name": "Lens L4", "label": "(f2)", "appearance": "lens in black ring mount" }, { "name": "Linear Polarizer", "label": "(Global Analyzer)", "appearance": "lens in black ring mount" }, { "name": "Polarization Camera", "label": "POLARIZATION CAMERA", "appearance": "blue and black box camera" } ] }, "inset_diagram": { "position": "bottom right, dashed border", "title": "{argument name=\"inset title\" default=\"Polarization Camera Micro-Polarizer Array\"} (Per-Pixel Analyzer)", "visuals": "4x4 grid of colored squares with white directional arrows", "legend_count": 4, "legend_labels": [ "red right-arrow 0° (H)", "green up-arrow 90° (V)", "blue diagonal-arrow 45° (D)", "yellow diagonal-arrow 135° (A)" ] }, "bottom_caption": { "figure_number": "Fig. 5.", "title": "{argument name=\"setup title\" default=\"Ellipsography Hardware Setup.\"}", "description": "{argument name=\"figure caption\" default=\"Our prototype display system employs a dual-modulation configuration to achieve simultaneous control of phase and polarization. A 4f relay optics setup transfers the modulated wavefront...\"}" } }