案例媒体
案例说明
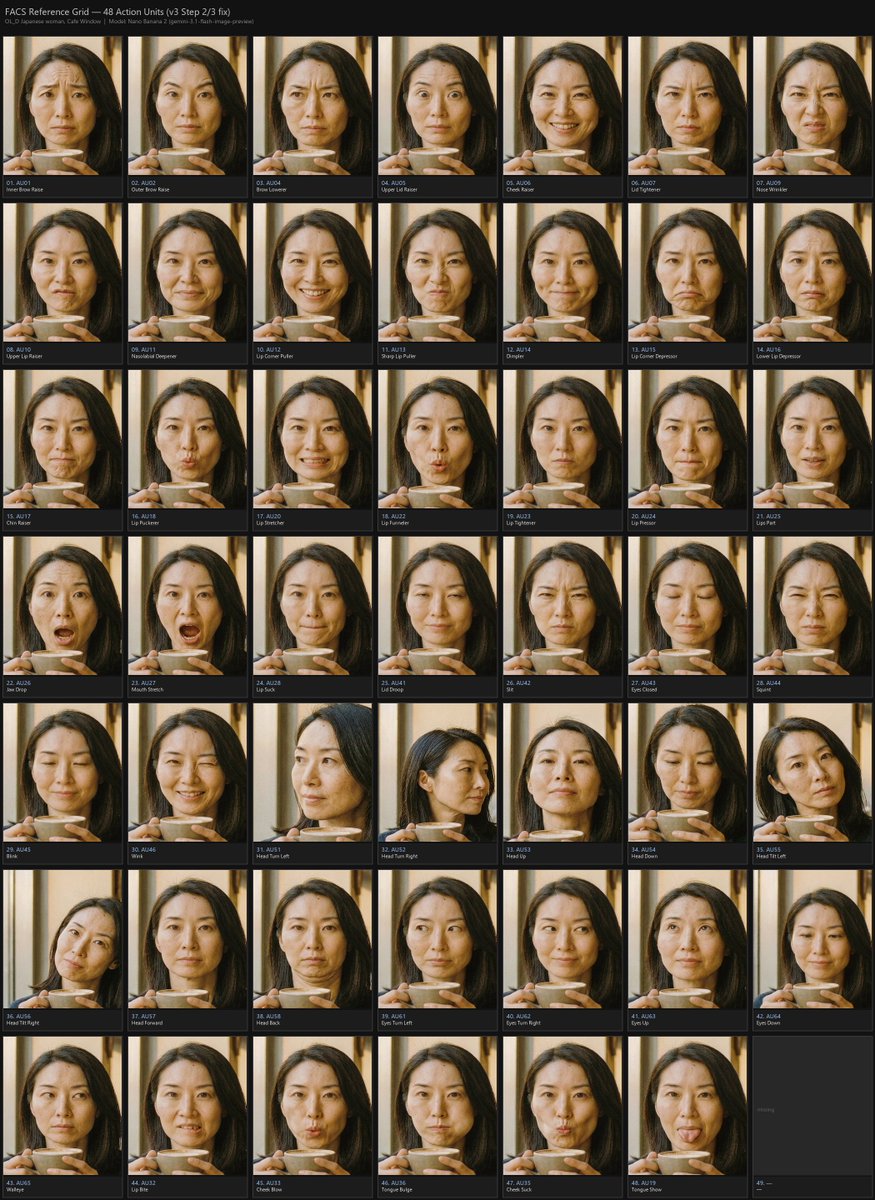
这个页面把案例媒体、完整 Prompt 和出处放在一起,方便你先看结果,再判断这条 Prompt 是否值得复制、收藏或加入对比。
案例解读
为了方便搜索、引用和后续复用,这里会把案例的适用场景、画面重点和 Prompt 结构拆成更容易浏览的说明。
这类案例适合用在什么场景
- 把它当作 UI 与社交媒体截图 的基准案例最合适,先看成片方向,再决定自己的 Prompt 要往哪边改。
- 如果你的目标也落在 人像、海报、UI 这些方向,这条案例特别适合先看图判断风格,再回头微调描述。
- 做 Prompt 对比时,也很适合作为控制组,只改一个变量去看结果变化。
画面重点与风格信号
- 这条案例最明显的风格信号集中在 人像、海报、UI,所以第一次改写时最好先保留这些关键词。
- 这类案例更值得先看界面密度、卡片层级,以及屏幕内容有没有先于文字讲清故事。
- 当前保留了 2 份媒体输出,适合顺手观察同一方向在多张结果里的稳定性。
Prompt 结构可以怎么理解
- 这条 Prompt 整体属于一条比较长、约束条件很多的 Prompt,很适合拿来判断这类方向到底需要写到多细。
- 关键词簇主要围绕 人像、海报、UI 展开,所以复用时可以先保留这组风格词,再替换主体、镜头、环境或文案信息。
- 最稳的改写方式通常是先保留结果方向和最强风格信号,只替换主体设定与场景块。
如果你是带着问题来的,可以先看这些角度
- 如果保留 人像、海报、UI,只换主体题材,结果最先变化的会是哪一部分?
- 这条结果里,哪些特征更像是 UI 与社交媒体截图 的结构特征,哪些又是标签风格本身带来的?
- 同分类的相关案例里,哪几条能给你更克制或更极致的相邻变体?
完整 Prompt
{"type":"FACS facial action coding system reference grid poster","title":"{argument name=\"headline text\" default=\"FACS Reference Grid — 48 Action Units (v3 Step 2/3 fix)\"}","subtitle":"OLD algorithm woman, Cafe Window | Model Name: {argument name=\"model name\" default=\"banana 2\"} | eyes v3.1, flash mug-preview","overall_style":"dark technical contact-sheet layout, small white sans-serif typography, thin grid gutters, photographic thumbnails, warm cafe-window lighting, muted black and charcoal UI background","subject":{"description":"{argument name=\"subject\" default=\"young woman with long dark hair holding a beige ceramic cup near her mouth\"}","setting":"{argument name=\"setting\" default=\"warm cafe window interior with vertical window frames and golden daylight\"}","face_treatment":"each thumbnail shows the same portrait composition with a large soft-edged beige rectangular anonymization mask covering the central face area while hair, hands, cup, neck, and background remain visible"},"layout":{"canvas":"portrait poster, approximately 4:5 aspect ratio, black background","header":"two-line header at top left, compact and technical","grid":{"count_total_tiles":49,"count_filled_action_units":48,"count_empty_tiles":1,"columns":7,"rows":7,"thumbnail_style":"each tile has a photographic image on top and a dark caption bar below with a numeric index, AU code, and action label","empty_tile":"bottom-right tile is blank dark gray with tiny text reading missing and a label line 49. ---"}},"action_units":[{"index":1,"code":"AU01","label":"Inner Brow Raise"},{"index":2,"code":"AU02","label":"Outer Brow Raise"},{"index":3,"code":"AU04","label":"Brow Lowerer"},{"index":4,"code":"AU05","label":"Upper Lid Raiser"},{"index":5,"code":"AU06","label":"Cheek Raiser"},{"index":6,"code":"AU07","label":"Lid Tightener"},{"index":7,"code":"AU09","label":"Nose Wrinkler"},{"index":8,"code":"AU10","label":"Upper Lip Raiser"},{"index":9,"code":"AU11","label":"Nasolabial Deepener"},{"index":10,"code":"AU12","label":"Lip Corner Puller"},{"index":11,"code":"AU13","label":"Sharp Lip Puller"},{"index":12,"code":"AU14","label":"Dimpler"},{"index":13,"code":"AU15","label":"Lip Corner Depressor"},{"index":14,"code":"AU16","label":"Lower Lip Depressor"},{"index":15,"code":"AU17","label":"Chin Raiser"},{"index":16,"code":"AU18","label":"Lip Puckerer"},{"index":17,"code":"AU20","label":"Lip Stretcher"},{"index":18,"code":"AU22","label":"Lip Funneler"},{"index":19,"code":"AU23","label":"Lip Tightener"},{"index":20,"code":"AU24","label":"Lip Pressor"},{"index":21,"code":"AU25","label":"Lips Part"},{"index":22,"code":"AU26","label":"Jaw Drop"},{"index":23,"code":"AU27","label":"Mouth Stretch"},{"index":24,"code":"AU28","label":"Lip Suck"},{"index":25,"code":"AU41","label":"Lid Droop"},{"index":26,"code":"AU42","label":"Slit"},{"index":27,"code":"AU43","label":"Eyes Closed"},{"index":28,"code":"AU44","label":"Squint"},{"index":29,"code":"AU45","label":"Blink"},{"index":30,"code":"AU46","label":"Wink"},{"index":31,"code":"AU51","label":"Head Turn Left"},{"index":32,"code":"AU52","label":"Head Turn Right"},{"index":33,"code":"AU53","label":"Head Up"},{"index":34,"code":"AU54","label":"Head Down"},{"index":35,"code":"AU55","label":"Head Tilt Left"},{"index":36,"code":"AU56","label":"Head Tilt Right"},{"index":37,"code":"AU57","label":"Head Forward"},{"index":38,"code":"AU58","label":"Head Back"},{"index":39,"code":"AU61","label":"Eyes Turn Left"},{"index":40,"code":"AU62","label":"Eyes Turn Right"},{"index":41,"code":"AU63","label":"Eyes Up"},{"index":42,"code":"AU64","label":"Eyes Down"},{"index":43,"code":"AU65","label":"Walleye"},{"index":44,"code":"AU32","label":"Lip Bite"},{"index":45,"code":"AU33","label":"Cheek Blow"},{"index":46,"code":"AU36","label":"Tongue Bulge"},{"index":47,"code":"AU35","label":"Cheek Suck"},{"index":48,"code":"AU19","label":"Tongue Show"}],"generation_instructions":"Create a consistent reference grid using the same subject, camera angle, cup, lighting, and background in every filled tile. Vary only the facial action or head/eye direction indicated by each label, even though the face is mostly hidden by the anonymization mask. Keep labels crisp and legible, with exact AU codes and numbering."}