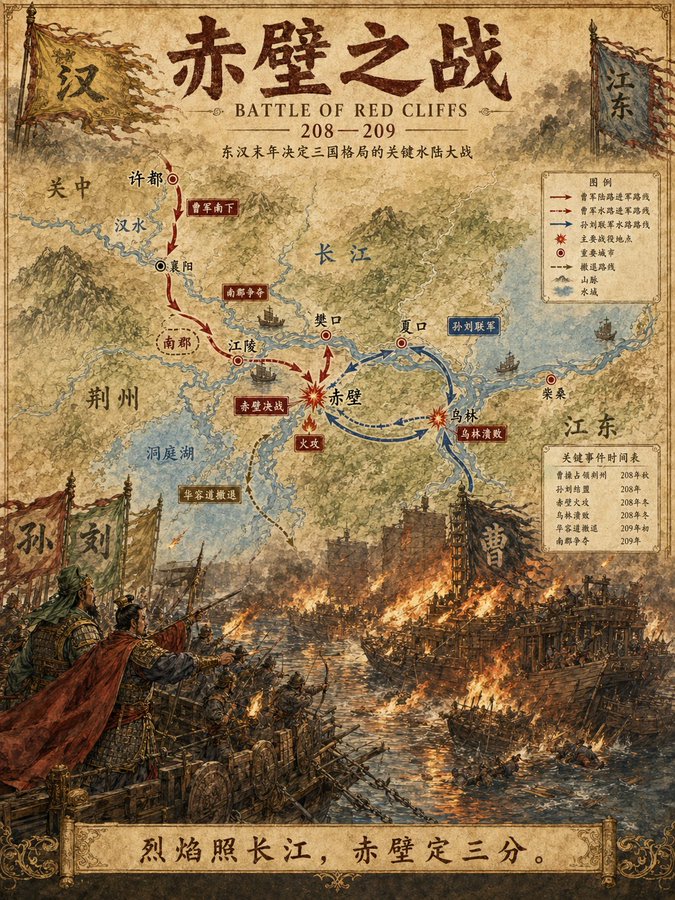
案例媒体

案例说明
这个页面把案例媒体、完整 Prompt 和出处放在一起,方便你先看结果,再判断这条 Prompt 是否值得复制、收藏或加入对比。
案例解读
为了方便搜索、引用和后续复用,这里会把案例的适用场景、画面重点和 Prompt 结构拆成更容易浏览的说明。
这类案例适合用在什么场景
- 把它当作 海报与插画 的基准案例最合适,先看成片方向,再决定自己的 Prompt 要往哪边改。
- 如果你的目标也落在 海报、插画、城市视觉 这些方向,这条案例特别适合先看图判断风格,再回头微调描述。
- 做 Prompt 对比时,也很适合作为控制组,只改一个变量去看结果变化。
画面重点与风格信号
- 这条案例最明显的风格信号集中在 海报、插画、城市视觉,所以第一次改写时最好先保留这些关键词。
- 重点多半在版式节奏、标题层级、插画材质和信息在画面里的摆放方式。
- 当前只有一张主图,所以第一张结果图就是最核心的参考基准。
Prompt 结构可以怎么理解
- 这条 Prompt 整体属于一条比较长、约束条件很多的 Prompt,很适合拿来判断这类方向到底需要写到多细。
- 关键词簇主要围绕 海报、插画、城市视觉 展开,所以复用时可以先保留这组风格词,再替换主体、镜头、环境或文案信息。
- 最稳的改写方式通常是先保留结果方向和最强风格信号,只替换主体设定与场景块。
如果你是带着问题来的,可以先看这些角度
- 如果保留 海报、插画、城市视觉,只换主体题材,结果最先变化的会是哪一部分?
- 这条结果里,哪些特征更像是 海报与插画 的结构特征,哪些又是标签风格本身带来的?
- 同分类的相关案例里,哪几条能给你更克制或更极致的相邻变体?
完整 Prompt
Design Concept: The Crumple Chair Core Philosophy: Translating the "controlled chaos" of a tossed paper ball into a sculptural, high-comfort seating experience. Stage 1: Observation & Morphological Analysis The goal is to deconstruct the image of the crumpled paper into usable geometric data. Crease Mapping: Identify the primary "valley" and "ridge" lines. These represent potential structural ribs or seams in the chair. Faceted Planes: Break down the sphere into a series of non-uniform polygons. Each flat surface of the paper becomes a potential panel for the chair’s upholstery or shell. Shadow Study: Analyze how the "tossed" form creates deep recesses. These natural pockets guide where the user’s weight will be cradled. Stage 2: Iterative Form Exploration Moving from a sphere to a seat through "Digital Crumpling." Subtractive Sculpting: Imagine the paper ball as a solid mass. Use Boolean operations to "carve out" a seating cavity that fits the human form while maintaining the external jagged texture. Tension Simulation: Use 3D software (like Rhino or Blender) to simulate a flat sheet of material being compressed. This ensures the folds look authentic and not "modeled." The "Toss" Logic: Experiment with gravity-based simulation dropping a digital mesh to see how it settles naturally, mimicking the "tossed" origin. Stage 3: Ergonomic Translation & Blueprinting Refining the raw aesthetic into a functional object. The Comfort Core: Overlay a standard ergonomic template (Seating Angle: 105°–110°) over the crumpled form. Adjust the internal "folds" to provide lumbar support and pressure relief. Blueprint Generation: Create technical orthographic views (Front, Side, Top). Map out the dimensions: Seat Height: 450mm Total Width: 850mm Surface Smoothing: Maintain the sharp "paper edges" on the exterior shell while softening the interior contact points for skin comfort. Stage 4: Structural Integration & Scaling Making the concept physically viable. The Skeleton: Design a hidden internal frame (likely CNC-bent steel rods or a 3D-printed lattice) that follows the most prominent ridges of the paper folds to provide rigidity. Material Selection: * Option A (High-End): Faceted, cast aluminum with a white powder coat. Option B (Soft): Vacuum-formed recycled plastic shell covered in "memory-fold" technical fabric that retains a wrinkled appearance. Stage 5: Final Prototyping & Material Finish Textural Replication: Apply a matte, slightly porous finish to the material to mimic the tactile feel of heavy-bond paper. Lighting Contrast: Use directional studio lighting in the final renders to emphasize the "tossed" shadows, making the chair look like a giant piece of discarded inspiration. Design Tip: To keep the "tossed" look authentic, avoid symmetry. The most compelling aspect of a crumpled paper ball is its unique irregularity—ensure the left and right sides of the chair are balance-equivalent but not identical